


There are many companies around the world selling plasters and, in my experience, very few offered much help in the way of knowledge for fireplace use etc. I always found myself using thin set as basecoats or other random cement polymer based products such as EIFS basecoats and they were terrible for workability, covering over cement boards, joints and did not provide proper substrates for my final layers of decorative plaster. The main issue using thin set is the sand is too fine and it is very sticky and is not designed to be spread as a plaster, and the EIFS basecoat was not much different and cracked very easily in my opinion.
With no other options I decided to design my own system for fireplaces which have now been in place for years and utilize special systems and Hydraulic lime basecoats that are designed specifically for the purpose of covering over cement board and drywall junctions, or entire cement board fireplaces.
LINK TO ARTICLE: https://shop.5starfinishes.ca/pages/how-to-plaster-fireplaces
How to Venetian or Concrete-Look Plaster your Fireplace:
Determine if the fireplace is zero clearance or not.
If it is zero clearance, then always have your contractor drywall the entire fireplace and finish it with corner bead and paper tape to a level 4 finish.
Make sure the drywall meets the fireplace flange correctly and has an L bead installed around the fireplace as described below. The work can all be carried out with drywall compound in this case.
Check the opening around the fireplace, if there is a grill or cover or if the drywall needs to meet up to the fireplace lip perfectly. Often times fireplaces are finished with drywall and the board does not meet up with the fireplace edges and cannot be plastered properly. If you have a covering or grill then this will hide this area.
It is also highly recommended to use a vent kit so the heat vents out the top of the fireplace and leaves the face more cool. This is not only safer for children and animals, but also provides a much cooler surface to prevent any heat discoloration over years of use, and usually means the fireplace can be boarded as a zero clearance.
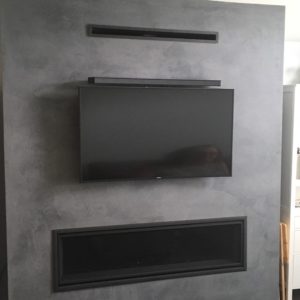
Follow link to see an example fireplace
If the fireplace is not a zero clearance, then most builders want to apply concrete board around the fireplace and then drywall the rest of the upper portions and returns.
This procedure leaves an area where the two boards meet that is out of plane, as concrete board and drywall are not the same thickness. You need to have the contractor smooth this area with 60 minute setting drywall compound, made of plaster of paris, which is fire resistant similar to lime, and be smoothed in the same fashion as a ‘butt joint’ is plastered in drywall seams. All corner beads can be installed and all joints can be taped in. If there is a requirement of an l bead angle to finish off around the opening of the fireplace then this should also be installed.
A better scenario for this case is to use Hardi Backer board which is ½ inch thick, instead of ¼ inch thick, and match up the concrete board with the half inch drywall as best as you can.
To make this joint even better, it is advised to use a concrete grinder and grind the cement board down at the edge to create a recess joint similar to the drywall. Ensure the recess of the drywall has not been cut away and is butting up to the cement board recess. This will prevent any change in elevation here and provide a proper joint that is not a “butt joint” and will require minimal work to set and smooth. If this fireplace has a grill covering the face, a drywall company can flush up the entire fireplace to a level 4 finish, leaving only the application of quartz primer and the decorative layers to the applicator.

In a zero clearance fireplace this would be drywall and could all be finished by a drywaller. In this particular case the entire fireplace is concrete board and not a zero clearance. In this case, any area near to the heat especially below and above should be taped in with tile adhesive, and any l bead set with tile adhesive. The corner bead on both sides and all joints 2 feet above the fireplace can all be finished as drywall would be.
Normally as an installer you would ask the contractor to finish the sides and above the fireplace threshold with drywall compound. The Installer for venetian plaster would be responsible for installing the l bead and finishing the joints near the fireplace with cement board fiber tape and polymer modified tile adhesive. If the cement board is not installed very carefully and has a lot of areas that need extra smoothing it makes sense to just use the below system outlined, using basecoat plaster over the entire project.
Always apply two layers of our high binding quartz primer first prior to applying any plaster and tile adhesive. If the fireplace opening is brick near the fire do not apply primer to this area.
All joints should be taped in with cement board fiber tape, not drywall fiber tape, and all joints and L bead angles, or any corner bead around an opening of concrete board to brick (for wood fireplace openings) should be set with polymer modified tile adhesive. The more expensive highly modified flexible mortars are preferred to prevent cracking. Use EIFS fiberglass mesh over the 4 corners as well so the mesh is covering over a foot span of the corners where cracking can happen.
/ __________ \ EIFS 12 inch wide mesh embedded in tile adhesive
/ __________ \
Allow the tile adhesive to dry, and then apply a layer of basecoat coarse over the entire surface to smooth and create an even absorbent surface. If there are large butt joints that do not match in the concrete board, you can smooth these out with the basecoat. In these cases, its recommended to use wet on wet applications as the first coat firms up, apply a second coat to further smooth the fireplace minimizing trips. Some knowledge of white set techniques is required for this, as applying the base coat like venetian plaster would follow the elevation changes too drastically and would not smooth the finish adequately. You need to finish the plaster with large strokes in the same direction of the joints to ensure the trowel is smoothing over them, creating a flat plane.

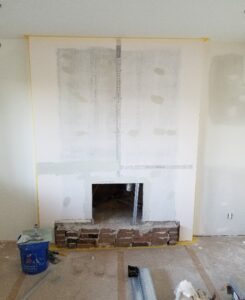
In the photo above, I had the contractor apply the corner beads on the outside and also set the internal corners to the ceiling and to the walls. This is very important as you cannot overlap basecoat on to the ceiling or surrounding drywall. He also countersunk all screw holes and ensured all joints were level and matched up as best as possible. The cement board has been primed with quartz primer and taped in with tile adhesive and cement board fiber tape. All the screw holes are also filled with the tile adhesive. The reason I did not have them use drywall compound on this project over the joints is because its fire burning, and the joint in the middle runs right to the edge of the heat. This would not be a good idea to simply use drywall compound, and I opted to use the tile adhesive and basecoat as its stronger and more durable under these circumstances. I also had to install the corner bead around the opening to interior bricks, and it made sense to just do the face and edges in this system.
You can apply as many layers of base coat as you like. If the final finish is rough or a matte finish, then you can simply use the coarse basecoat. If you have a finer plaster finish, you would want to develop your system so you smooth the cement board out with 2 layers of coarse, and 2 layers of fine so your final layer is not as rough to accommodate a finer plaster coat. Another option if you require a smooth finish for say our Vp Satin Marble, is to do two layers of drywall compound prior to applying the venetian plaster. In this case allow the basecoat to cure for one week prior to applying quartz primer and then your drywall compound. Another option is to apply two layers of VP satin Tintoretto over the base coat as a junction between the marble and basecoat which saves time and does not require primer.
Never apply quartz primer to basecoat in most cases as it will not allow it to cure and your top coats could delaminate. The top layers of decorative plasters should be applied directly to the basecoat.
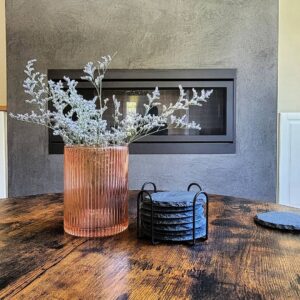
Apply your decorative plaster over your final prepared substrate, and then allow to dry 2 days. Seal the final finish with 2 layers of penetrating sealer as specified in our online shop and remove all tape etc.
Topcoat Directions:
When applying your decorative plaster finish over basecoat, the last coat of plaster will dry faster than normal, due to the extra layers of dry plasters absorbing moisture from your top coat. The trick for applying any fireplace finish, whether its over drywall or basecoat etc, is to always apply the last coat thicker than grain size over the entire face and as quickly as possible and then removing the excess after to smooth down the finish and create an even surface without any noticeable joint lines. Fireplaces are a very small feature, and unlike larger wall surfaces, should not generally feature any noticeable lap lines.
If the finish is more rough and has a stamped texture etc it is not as important to achieve such a flawless top coat as the stamping and texturing will remove a lot of the imperfection. In this case you can also use a sponge to rub out any joint lines prior to adding your texture etc. Rubbing out joint lines does not help with smoother finishes, as the trowel will simply smooth the grains again back over the laps and create the same problem. It can take some time to understand how to apply these finishes and to what thickness to achieve a correct appearance. In general applying tight thin layers of heavier finishes will create smoother lapping lines, as the plaster overlaps the other previously plastered area, and gives you a less monolithic appearance. You always want your edges to be thicker and more wet to allow the plaster to blend together.
Once the entire fireplace has plaster applied, go back quickly over the entire surface and remove all the excess plaster and or create the desired thickness and texture, polish etc as per your sample. If it’s a smooth polished finish, remove and scrape off any excess plaster, and begin smoothing and burnishing the finish creating an even and monolithic finish.
The only finishes that may not benefit from this style of application, is the VP satin Tintoretto, Concrete look fine, and VP satin marble. In most cases the marble finish is put on extremely thin on the last coat working in sections and polishing as you go. This product is so thin it does not create lap lines if applied correctly.
Products to use as you Venetian or Concrete-Look Plaster your Fireplace:
https://shop.5starfinishes.ca/products/high-binding-quartz-primer